
The biggest challenge in the process of medical billing and coding services is maintaining high coding accuracy. We can achieve this simply by understanding the basics of Medical coding. This blog will guide you towards successfully understanding medical coding for radiology. Freshers and beginners take note!
Header: The header appears at the top of the report and includes the identifying information obtained during the registration process. It typically includes the patient’s name, date of birth, account number and/or medical record number, the name and location of the imaging facility, and the date of the exam. It may also include diagnostic information entered by the registration staff or (if the facility has computerized order entry) by the emergency department or nursing unit. For the most part, the Header includes most of the patient demographic details. For hospital inpatient exams, the admitting diagnosis may also be provided in the header.
Ordered Procedure: This provides the exam ordered by the referring physician or the hospital. The ordered procedure and the technique might not always match. This can also be called the Title. This provides a general cue on what type of exam is performed on the patient. For Example, “CT Sinuses without contrast” “Right Knee 4 views”
Indications: This section may also be titled, “Clinical History” or “Clinical Indications” or “Clinical Statement” or Reason for Exam” or “History” or “Indication.” It describes the reasons for performing the exam. This can be provided either by the patient or by the ordering physician. For Example, “Chronic Sinusitis” “Knee pain” “Chest pain” “shortness of breath.”
Technique: This may also be titled “Examination.” This provides detailed information on the type of exam performed on the patient – Example “Chest AP and Lateral” “Right Knee, AP, lateral, both obliques and swimmers view.” This drives the CPT billed for the exam.
Findings: This is the interpretation of the images by the radiologist. Provides a detailed summary of any abnormalities visualized in the images and any other incidental or pertinent findings. Normal findings are also summarized. For example, if a CT sinus without contrast is performed on a patient with chronic sinusitis, and the images reveal maxillary and frontal sinusitis, the radiologist will document “maxillary and frontal sinusitis” in his report.”
Impression: The impression is the radiologist’s final opinion as to what is wrong with the patient, based on the imaging findings. It may either be a specific confirmed diagnosis like pneumonia, COPD, or may be an abnormal finding that cannot be attributed to a specific diagnosis (for example,“left breast nodule, liver lesion).
Any radiology report can be coded efficiently and accurately by following the steps.
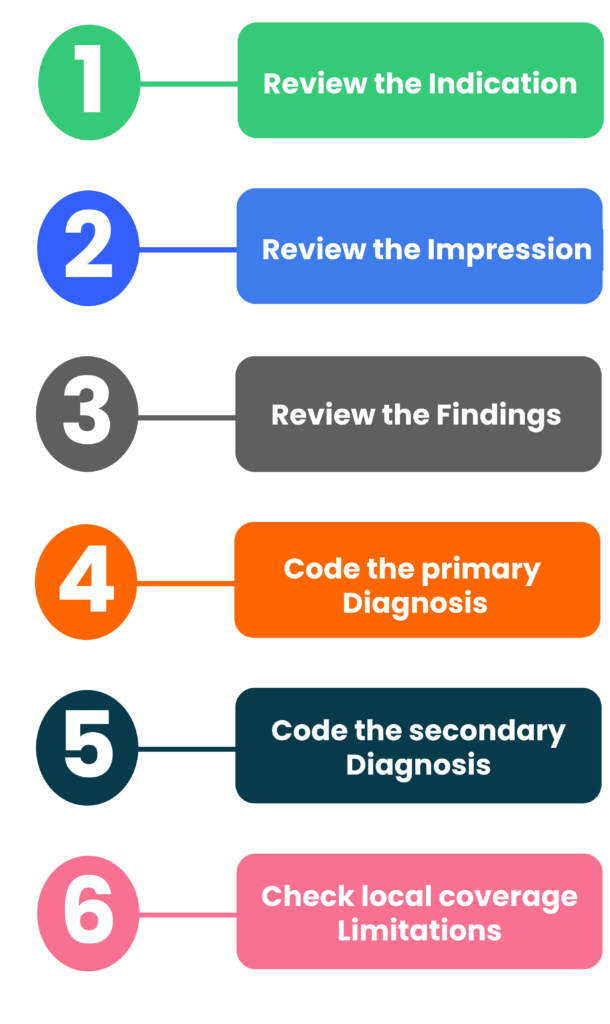
Step 1: Study the Indications
It is imperative to check the indications or the reason for the exam to understand why the exam was performed. This will also help the coders to not code conditions unrelated to the indications or the exam performed. This way we can also avoid coding incidental findings. So, this is the first step in coding the diagnosis. For example, if the indication is “right lower quadrant pain” and the radiologist has documented lumbar spondylosis and acute appendicitis in the findings, the appropriate first listed diagnosis should be “acute appendicitis.” “Lumbar spondylosis” is an incidental finding and should not be coded.
Step 2: Study the Impression
This is also titled “conclusion.” The next step would be to review the Impression carefully and compare the diagnosis or conditions mentioned in this section with the Indications. Only those conditions or diagnosis related with the indications should be coded. If coding for an outpatient setting, do not code unconfirmed diagnosis such as possible, probable, suspected, rule out. Only confirmed diagnosis should be coded. If the impression is normal, the indication or the reason for the exam should be coded as the final diagnosis.
Step 3: Study the Findings
Findings should also be reviewed with a view to code either relevant additional diagnosis or to add specificity to it. It should be noted, since the radiologist will document the complete findings of the interpretation of the image, only those findings/conditions relevant to the exam performed, and the indication should be coded as either the primary or the secondary diagnosis.
Step 4: Select and Assign the Most Appropriate Primary Diagnosis Code
The primary diagnosis code represents the main condition identified during the exam in relation to the indication or the reason for the exam. For Example, Indication states “Right knee pain” and the impression states “right knee osteoarthritis.” The code for right knee osteoarthritis would be the primary diagnosis. The primary diagnosis should match the reason for the exam. If not, code the symptom.
Step 5: Select and Assign the Secondary Diagnosis Code(s)
Any additional conditions that are significant to get the claim paid should also be reported. For example, for a patient with malignant neoplasm of the left lung, relevant history of smoking documented should be reported as the secondary diagnosis.
Step 6: Check Local Coverage Limitations
Always check with the respective Regional MAC to see if there are any coverage restrictions for the CPT and ICD-10-CM code pair being billed. Medicare coverage is limited to items and services that are reasonable and necessary for the diagnosis or treatment of an illness or injury. Always check to see if the primary diagnosis selected is covered by the payer.
This will close in 0 seconds